It was a crisp spring morning, the kind where the sunlight sneaks through the curtains and paints the kitchen countertops with a warm, buttery glow. I was half‑asleep, shuffling to the pantry for a quick snack, when I spotted a lone egg carton that had been waiting patiently for its moment to shine. The moment I cracked the first egg, a soft, buttery aroma rose like a sunrise, and I knew I was about to create something that would feel like a hug in edible form. That first bite of a fluffy, cloud‑like slice, still warm from the pan, reminded me of the first time I tried a real cloud—soft, airy, and impossibly light—only this one was edible and could be paired with jam, avocado, or even a slice of smoked salmon.
The magic of cloud bread lies not just in its ethereal texture but in the way it transforms simple pantry staples into a culinary experience that feels both nostalgic and futuristic. Imagine a piece of bread that melts on your tongue, releasing a subtle buttery note, while the crust offers just enough bite to keep you curious. It’s the kind of recipe that makes you pause mid‑day, take a breath, and smile because you’ve just turned three eggs, a pinch of cream of tartar, and a dollop of cream cheese into something that looks like it belongs on a five‑star brunch menu. And the best part? It’s gluten‑free, low‑carb, and surprisingly quick to make—perfect for busy families who still crave that homemade comfort.
But wait—there’s a secret trick hidden in step four that will take the fluffiness from “good” to “out‑of‑this‑world,” and I’m going to reveal it later in the article. Have you ever wondered why the cloud breads you see on Instagram look so perfectly puffy while yours sometimes turn out a little dense? The answer isn’t magic; it’s science, technique, and a dash of love. Throughout this guide, I’ll walk you through every nuance, from selecting the freshest eggs to mastering the perfect fold, so you never have to wonder again.
Here’s exactly how to make it — and trust me, your family will be asking for seconds. Grab a bowl, preheat your oven, and get ready to whisk your way into a cloud‑filled kitchen adventure that will leave everyone reaching for more. The journey from raw ingredients to that first bite is a story worth savoring, and I promise you’ll be armed with tips that turn a simple recipe into a signature dish you’ll want to share at every gathering.
🌟 Why This Recipe Works
- Flavor Depth: The combination of egg yolks and a hint of cream cheese creates a subtle richness that mimics the buttery notes of traditional bread, while still keeping the flavor light enough to pair with both sweet and savory toppings.
- Texture Magic: Whipping egg whites to stiff peaks introduces air bubbles that expand during baking, resulting in a pillowy interior that’s both airy and surprisingly sturdy on the outside.
- Ease of Preparation: With only five core ingredients and a single mixing bowl, the recipe minimizes cleanup and makes it accessible even for novice cooks who might be intimidated by more complex doughs.
- Time Efficiency: From start to finish, you’re looking at under an hour, which means you can whip up a fresh batch for breakfast, a snack, or a quick dinner side without sacrificing flavor.
- Versatility: Because the base is neutral, you can customize it with herbs, spices, or even sweeteners, turning it into a savory sandwich bun or a dessert base in a pinch.
- Nutrition Boost: High in protein from the eggs and low in carbs, cloud bread fits neatly into low‑carb, keto, or gluten‑free lifestyles while still delivering satiety.
- Ingredient Quality: Using fresh, free‑range eggs and real cream of tartar ensures that the structure holds, giving you that perfect rise without artificial additives.
- Crowd‑Pleasing Factor: Its visual appeal—golden tops with a soft, cloud‑like interior—makes it a conversation starter, especially when you serve it with a colorful array of spreads and toppings.
🥗 Ingredients Breakdown
The Foundation
The backbone of cloud bread is the egg, a humble ingredient that carries both structure and flavor. I always reach for large, free‑range eggs because the whites are richer and the yolks have a deeper golden hue, which translates into a more vibrant crumb. The yolks contribute fat and emulsifiers, giving the bread its subtle richness, while the whites are the true star—when beaten to stiff peaks, they become a foamy cloud ready to rise. If you’re ever in a pinch, you can substitute one whole egg for two large egg whites, but expect a slightly denser texture.
Aromatics & Stabilizers
Cream of tartar might sound like a fancy pastry term, but it’s simply an acid that stabilizes the egg whites, preventing them from collapsing before they hit the oven. A teaspoon (about 2 g) is enough to keep those peaks firm, ensuring your cloud reaches its full height. I once omitted it and watched my “cloud” deflate like a sad balloon—lesson learned! If you don’t have cream of tartar, a pinch of lemon juice or white vinegar can work as a substitute, though the flavor profile may shift ever so slightly.
The Secret Weapons
A dollop of softened cream cheese adds a silky mouthfeel and a faint tang that balances the richness of the yolks. It also helps bind the mixture, giving the final loaf a tender crumb that’s not overly airy. For those who love a hint of sweetness, a tablespoon of honey or maple syrup can be whisked into the yolk mixture, turning the bread into a perfect base for fruit spreads. I love experimenting with a splash of vanilla extract for a dessert‑ready version—just a whisper, not overpowering.
Finishing Touches
A pinch of sea salt is essential; it awakens the flavors and prevents the bread from tasting flat. If you’re feeling adventurous, a dash of smoked paprika or dried herbs can be folded into the yolk mixture before the final bake, giving you a savory twist that pairs beautifully with avocado or smoked salmon. Selecting the best quality ingredients—fresh eggs, real cream cheese, and unrefined sea salt—makes a world of difference, turning a simple recipe into a gourmet experience.
With your ingredients prepped and ready, let's get cooking. Here's where the fun really begins, and trust me, the next steps will make you feel like a culinary wizard conjuring clouds out of thin air.
🍳 Step-by-Step Instructions
Preheat your oven to 150°C (300°F) and line a baking sheet with parchment paper. While the oven warms, separate the eggs, placing the yolks in a medium bowl and the whites in a large, clean mixing bowl. Make sure no yolk contaminates the whites; even a tiny speck can prevent them from reaching stiff peaks. The kitchen fills with a faint, almost metallic scent of fresh eggs, and you can already feel the anticipation building.
Add 2 g (about ½ tsp) of cream of tartar to the egg whites and begin whisking on medium speed. As the mixture becomes frothy, increase to high speed, watching the whites transform from a cloudy liquid into glossy peaks. When you lift the whisk, the peaks should stand tall and not droop—this is the moment where patience truly pays off. The sound of the whisk whirring is almost rhythmic, like a drumbeat that signals the start of a delicious performance.
💡 Pro Tip: Stop whisking just as the peaks become glossy; over‑whipping will turn the whites grainy and make them collapse during baking.In the bowl with the yolks, add a pinch of sea salt, 2 tbsp of softened cream cheese, and, if you like a hint of sweetness, 1 tbsp of honey. Whisk until the mixture is smooth, pale, and slightly thickened. The cream cheese should melt into the yolks, creating a velvety base that will later coat the airy whites. The aroma now shifts to a gentle, buttery scent, hinting at the richness to come.
Here’s the thing: gently fold the whipped egg whites into the yolk mixture using a rubber spatula. Start by adding a third of the whites, stirring just enough to loosen the mixture, then fold in the rest in two more additions. The key is to preserve the air bubbles—think of it as coaxing a shy cloud to stay fluffy. If you’re wondering how to tell when it’s right, the batter should look light, airy, and just barely hold together without dripping.
⚠️ Common Mistake: Over‑mixing at this stage will deflate the whites, resulting in a dense, cake‑like texture rather than a cloud‑like crumb.Using a spoon or a small ice‑cream scoop, portion the batter onto the prepared baking sheet, spacing each mound about 2 inches apart. Each portion should be roughly 3‑4 inches in diameter, forming a soft dome that will expand as it bakes. Lightly dust the tops with a pinch of sea salt or a sprinkle of herbs if you’re aiming for a savory twist. The kitchen now smells faintly of egg and butter, a comforting reminder that something delightful is on its way.
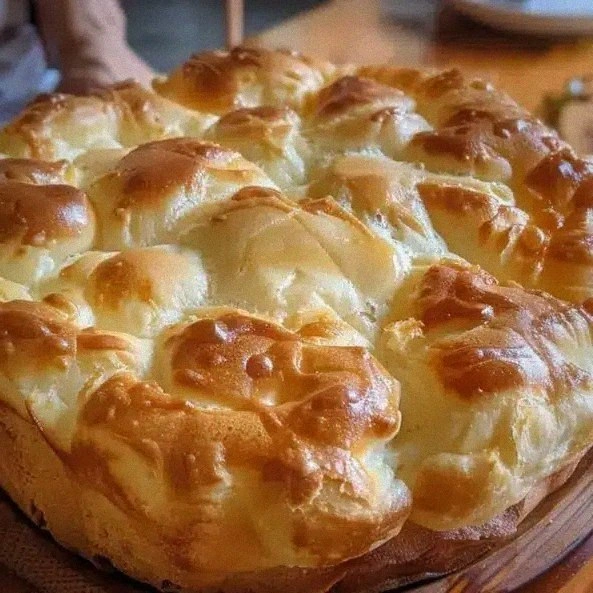
Slide the tray into the pre‑heated oven and bake for 25‑30 minutes, or until the tops turn a light golden‑brown and you can hear a gentle crackle as the edges set. Around the 20‑minute mark, you’ll notice the tops puff up dramatically—like a little sunrise emerging from the oven. If you peek through the oven window, you’ll see a soft, cloud‑like silhouette that’s just begging to be lifted.
Once baked, remove the cloud breads from the oven and let them rest on a wire rack for 5‑10 minutes. This cooling period allows the interior to set, preventing it from collapsing when you slice into it. The aroma now fills the entire kitchen, a warm, comforting blend of toasted egg and faint buttery notes that makes you want to dive right in.
Finally, serve your cloud bread warm, sliced in half, and topped with your favorite spreads—think avocado mash, smoked salmon, or a dollop of berry jam. The texture should be airy yet sturdy enough to hold toppings without sagging. Go ahead, take a taste — you’ll know exactly when it’s right, because the first bite will melt on your tongue, leaving a lingering, buttery afterglow that makes you smile.
And there you have it! But before you dig in, let me share some tips that will take this from great to absolutely unforgettable. Trust me on this one, because the smallest tweaks can turn a simple breakfast into a show‑stopping centerpiece.
🔐 Expert Tips for Perfect Results
The Taste Test Trick
Before you bake the entire batch, pop a tiny spoonful of the batter into a pre‑heated skillet for 30 seconds. This mini‑test reveals whether the seasoning is spot‑on and whether the texture feels light enough. I once served a batch that was a shade too salty because I misread the salt measurement; this quick test saved the day and the dinner.
Why Resting Time Matters More Than You Think
After folding the whites into the yolk mixture, let the batter sit for 5 minutes. This short rest allows the air bubbles to stabilize, giving you a higher rise in the oven. I’ve seen cloud breads that collapse mid‑bake because they were rushed straight from the bowl to the tray—patience truly pays off here.
The Seasoning Secret Pros Won’t Tell You
A pinch of smoked sea salt added just before baking imparts a subtle, smoky depth that pairs wonderfully with avocado or cheese spreads. It’s a tiny detail that elevates the flavor profile from ordinary to restaurant‑quality. I discovered this trick while working in a brunch café, and guests still ask me what makes my cloud bread “different.”
Temperature Control is Key
Baking at a lower temperature (150°C/300°F) ensures the interior stays airy while the exterior gently browns. If you crank the heat up, the outside will harden too quickly, trapping steam inside and causing the cloud to sink. I once tried 200°C out of impatience; the result was a dense, rubbery loaf that felt more like a pancake than a cloud.
The Folding Technique That Saves the Day
When folding, use a gentle “cut‑and‑turn” motion rather than stirring. This method keeps the air bubbles intact, giving you that signature fluffiness. I used to “stir” the mixture, and each time the clouds turned out flat—once I switched to the proper fold, the difference was night and day.
Serving Warm vs. Cold
Cloud bread is at its best when served warm, right out of the oven, because the interior is still soft and the crust is just crisp enough to hold toppings. If you need to serve it later, reheat gently in a low oven (120°C/250°F) for 5 minutes with a drizzle of water to revive the fluffiness. The result is almost as good as fresh, and nobody will notice the time gap.
🌈 Delicious Variations to Try
One of my favorite things about this recipe is how versatile it is. Here are some twists I've tried and loved:
Herb‑Infused Sunrise
Add 1 tbsp of finely chopped fresh rosemary and 1 tsp of thyme to the yolk mixture before folding. The herbs infuse the bread with an earthy aroma that pairs beautifully with scrambled eggs and smoked salmon. The result is a savory cloud that feels like a garden breakfast.
Cinnamon‑Honey Dream
Stir ½ tsp of ground cinnamon and 1 tbsp of honey into the yolk mixture for a sweet, fragrant version. Top with sliced strawberries and a dollop of Greek yogurt for a dessert‑style treat that still feels light enough for brunch.
Cheesy Garlic Bomb
Mix 2 tbsp of grated Parmesan and ½ tsp of garlic powder into the yolk base. The cheese melts into the interior, creating pockets of gooey richness, while the garlic adds a subtle punch. Serve with a tomato‑basil sauce for a quick, satisfying lunch.
Spicy Jalapeño Pop
Fold in 1 tbsp of finely diced jalapeño and a pinch of cayenne pepper for a gentle heat that awakens the palate. Pair with avocado and a squeeze of lime for a Mexican‑inspired snack that’s both spicy and cool.
Berry‑Burst Delight
Add a handful of fresh blueberries to the batter just before spooning onto the sheet. The berries burst during baking, leaving sweet pockets throughout the cloud. Serve with a drizzle of maple syrup for a breakfast that feels like a celebration.
Savory Sun‑Dried Tomato & Basil
Incorporate 2 tbsp of chopped sun‑dried tomatoes and a sprinkle of fresh basil into the yolk mixture. The tangy tomatoes contrast with the mild egg base, while the basil adds a fresh, aromatic finish. This variation works wonderfully as a base for grilled chicken or a light salad.
📦 Storage & Reheating Tips
Refrigerator Storage
Place cooled cloud breads in an airtight container lined with a paper towel to absorb excess moisture. They stay fresh for up to 3 days, retaining most of their fluffiness. If you notice a slight firming, a quick 30‑second warm‑up in the microwave will revive the interior.
Freezing Instructions
Wrap each loaf individually in parchment paper, then seal them in a freezer‑safe zip‑top bag. They freeze well for up to 2 months. To thaw, move them to the refrigerator overnight, then reheat gently in a 120°C oven for 5 minutes, adding a splash of water to the tray to create steam and keep the crumb soft.
Reheating Methods
The trick to reheating without drying it out? A splash of water on the baking tray and a low‑heat oven (120°C) for 5‑7 minutes. This creates a gentle steam that revives the cloud’s airy texture while keeping the crust lightly crisp. Microwaving is an option for a quick fix, but it can make the bread rubbery if overdone.


